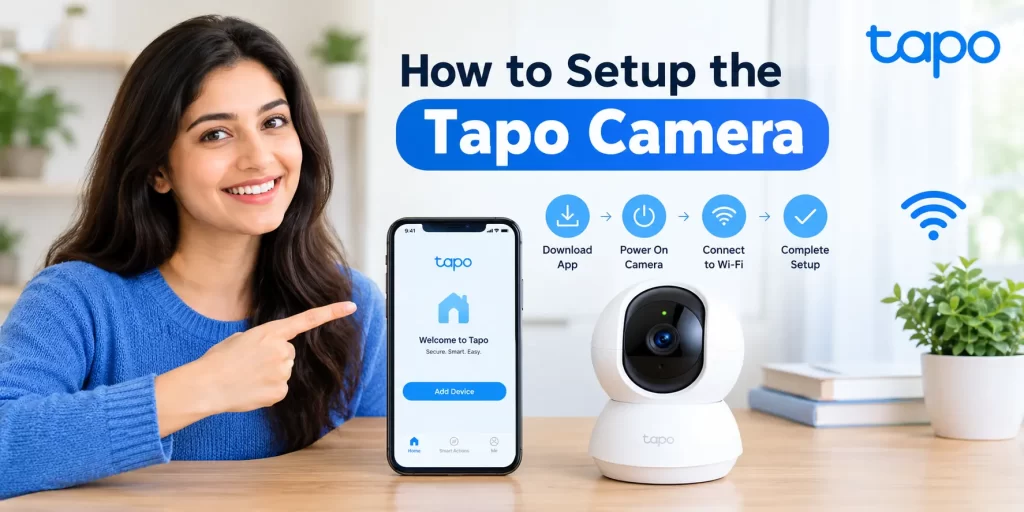
Setting up a new Tapo camera is usually a quick process, but the first setup can feel confusing if you’re not sure which app to use, which Wi-Fi network to select or what the camera’s LED is telling you.
Whether you have an indoor Tapo camera, outdoor security camera or a battery-powered model, the basic process is similar: install the Tapo app, sign in with your TP-Link ID, put the camera into setup mode, connect it to your Wi-Fi network and finish the configuration in the app.
This Tapo camera setup guide walks you through the entire process and also covers installation, iPhone vs. Android setup, LED meanings, common connection problems, resetting the camera and what to do after setup.
To set up a Tapo camera, download the Tapo app, sign in with your TP-Link ID, power on the camera and wait for the setup LED pattern. Then tap Add Device in the app, select your camera model, connect your phone to the camera when prompted, choose your home 2.4 GHz Wi-Fi network and enter the password.
What You Need Before Setting Up a Tapo Camera
Before starting your Tapo camera setup, keep a few things ready. Doing these checks first can save you from stopping halfway through the installation.
You will generally need:
- A compatible Tapo camera
- The Tapo app
- A TP-Link ID
- A smartphone or tablet
- Your Wi-Fi network name
- Your Wi-Fi password
- The camera’s power adapter or a charged battery
- A location with a good Wi-Fi signal
TP-Link’s current setup instructions state that the Tapo app is available for iOS and Android and that a TP-Link ID is required to complete the camera setup. For the standard wireless setup flow, the camera connects to a 2.4 GHz Wi-Fi network.
Quick Pre-Setup Checklist
What you need | Why it matters |
Tapo camera | Check the exact model before starting |
Tapo app | Used to add and configure the camera |
TP-Link ID | Required to sign in and manage the device |
2.4 GHz Wi-Fi | Required for the standard setup flow on supported models |
Wi-Fi password | Needed when connecting the camera to your router |
Smartphone/tablet | Used to complete setup |
Camera power | Camera must be powered on during pairing |
Good Wi-Fi signal | Helps prevent setup failures and offline issues |
Tip: Keep your phone close to the camera during setup. TP-Link specifically recommends keeping the phone near the device while configuring it.
Check Your Tapo Camera Model
Before following any setup instructions, identify the exact model number.
You may have a model such as:
- Tapo C100
- Tapo C200
- Tapo C210
- Tapo C220
- Tapo C310
- Tapo C320WS
- Tapo C500
- Tapo C520WS
- Tapo C410
- Tapo C420
- Tapo C425
The setup process is similar, but the physical reset button, LED behavior, power method, mounting hardware and available connection options can differ. TP-Link also maintains model-specific support pages with user guides, firmware, setup videos and hardware-version information.
How to Set Up a Tapo Camera
Now let’s go through the actual Tapo camera setup process.
1. Download the Tapo App
Start by installing the official Tapo app on your smartphone or tablet. You can download it from the Apple App Store or Google Play. TP-Link also provides a QR code for the app in many camera packages and setup guides.
After installing it:
- Open the Tapo app.
- Allow the requested permissions.
- Continue to the sign-in screen.
- Keep the app open while preparing the camera.
Don’t use a random third-party app that claims to configure your Tapo camera. The official Tapo app is the normal setup method for supported Tapo cameras.
2. Sign In or Create a TP-Link ID
You need a TP-Link ID to manage your Tapo camera.
If you already have an account:
- Open the Tapo app.
- Enter your TP-Link ID email address.
- Enter your password.
- Tap Log In.
If you don’t have an account, select Sign Up and follow the instructions. Your TP-Link ID is used to associate your Tapo devices with your account, so use an email address you can access later. If you have trouble signing in, you can troubleshoot your account separately using our recover a locked Tapo account guide.
3. Power On the Tapo Camera
Connect the camera to its power adapter and turn it on.
For battery-powered Tapo cameras, follow the model-specific instructions to power the camera on. TP-Link’s current general setup guide notes that some battery-powered models require holding the Power button for about three seconds.
Wait around 30 seconds for the camera to start. Don’t immediately press random buttons if the camera doesn’t respond. First, check the LED.
A Tapo camera that is ready for normal Wi-Fi setup will typically show a blinking red and green LED.
4. Put the Camera Into Setup Mode
The camera needs to be in pairing/setup mode before the app can configure it. For many Tapo models, the setup-ready state is indicated by a blinking red and green LED.
If you don’t see that pattern:
- Check that the camera is powered on.
- Wait for the startup process to finish.
- Check the camera’s Quick Installation Guide.
- If required, press and hold the reset button for at least five seconds.
- Wait for the camera to return to setup mode.
The exact reset behavior can vary by model. Some Tapo camera guides distinguish between resetting Wi-Fi settings and performing a full factory reset, so don’t assume every model uses the same button timing.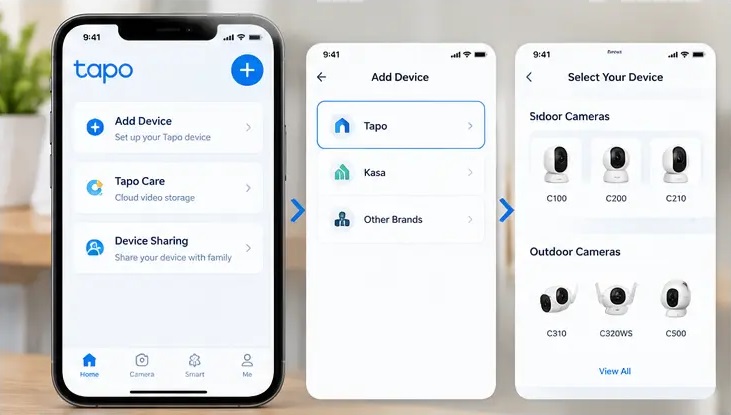
Use the Tapo app to select your camera model and begin the setup process.
5. Add the Camera in the Tapo App
Once the camera is ready:
- Open the Tapo app.
- Tap the + button.
- Select Add Device.
- Select Tapo.
- Choose the appropriate camera category.
- Select your camera model.
Depending on the app version, you may also be able to search for the model by name. TP-Link’s current camera setup instructions use + > Add Device, followed by selecting the camera model or camera category.
If you select the wrong model, the app may show instructions that don’t match your camera. Check the model number printed on the camera or its packaging before continuing.
6. Connect Your Phone to the Tapo Camera
The next step depends on the camera model. Some Tapo cameras use a temporary Wi-Fi connection during setup, while supported models may use Bluetooth as part of the pairing process. TP-Link’s current setup guide explains both methods.
If the app asks you to connect to the camera’s Wi-Fi
On some models, you’ll see a temporary network similar to:
Tapo_Cam_XXXX
Open your phone’s Wi-Fi settings, select the camera’s temporary network and return to the Tapo app. On iPhone, the temporary network may show No Internet Connection. That’s expected during this local setup stage; return to the Tapo app after connecting.
If your camera uses Bluetooth setup
Turn on Bluetooth and keep your phone close to the camera. The Tapo app will guide you through device discovery.
If the camera isn’t detected:
- Make sure Bluetooth is enabled.
- Move the phone closer.
- Restart the camera.
- Restart the Tapo app.
- Check the required permissions.
7. Connect the Tapo Camera to Wi-Fi
Once the app finds the camera, you’ll need to connect it to your home network. For the standard wireless setup covered by TP-Link’s current guide:
- Select your 2.4 GHz Wi-Fi network.
- Enter your Wi-Fi password.
- Tap Next.
- Wait while the camera connects.
- Don’t unplug the camera during this process.
TP-Link’s current Tapo camera setup documentation states that the camera connects to a 2.4 GHz Wi-Fi network during setup.
What if your Wi-Fi network isn’t listed?
Tap Rescan if that option is available. If the network still doesn’t appear:
- Move the camera closer to the router.
- Confirm the router’s 2.4 GHz network is enabled.
- Check the Wi-Fi password.
- Restart the router.
- Temporarily turn off VPN or advanced network filtering on the phone.
- Try setup again.
TP-Link’s current troubleshooting guidance also recommends moving the device closer to the router and checking that the 2.4 GHz network is available.
8. Name and Assign a Location to Your Camera
After the camera connects successfully, the Tapo app will ask you to give it a name and assign a location.
For example:
- Front Door
- Living Room
- Garage
- Backyard
- Baby Room
- Office
Choose a name you’ll recognize quickly when viewing multiple cameras. You can also select the appropriate room or location in the app.
This becomes especially useful if you later add more Tapo cameras.
9. Complete the Setup
Once the pairing process finishes, the Tapo app should show a completion screen. Tap on Done and open the camera’s live view.
Check that:
- The camera appears online.
- The live video feed loads.
- The camera responds to app commands.
- The correct camera name appears.
- The camera is assigned to the right room.
TP-Link’s current setup guide states that the camera is successfully added to your account when the Complete screen appears. Your basic Tapo security camera setup is now complete.
How to Install and Position a Tapo Camera
Setting up the camera in the app is only half the job. Where you install it can affect video quality, motion detection and Wi-Fi reliability.
For indoor cameras
A shelf, table, cabinet or wall can work well.
Try to:
- Keep the camera at a useful viewing height.
- Point it toward the area you actually want to monitor.
- Avoid placing it directly behind glass.
- Keep it away from strong direct light.
- Leave enough room for the camera to rotate if it is a pan/tilt model.
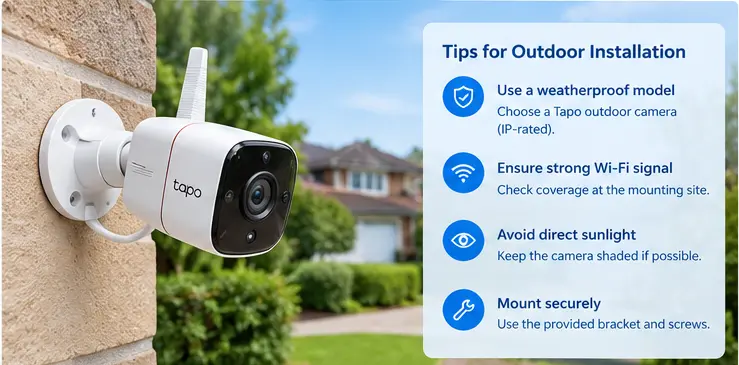
For outdoor cameras
Choose a location with:
- Strong Wi-Fi coverage
- A clear view of the monitored area
- Appropriate protection from weather
- A stable mounting surface
- Minimal direct glare
TP-Link specifically recommends testing Wi-Fi signal strength at the intended mounting location before installing the camera. It also advises avoiding direct sunlight and mounting the camera where the view is clear and unobstructed.
For battery-powered models, placement matters even more. TP-Link recommends appropriate mounting height and angle for its battery cameras and advises avoiding views dominated by moving trees, roads or other sources of unnecessary motion detection.
Tapo Camera Placement Checklist
Placement factor | Recommended approach |
Wi-Fi signal | Test Wi-Fi at the installation location first |
Camera view | Keep the monitored area clear and unobstructed |
Direct sunlight | Avoid pointing directly toward strong sunlight |
Glass/windows | Avoid placing cameras behind glass when possible |
Height | Follow the model’s recommended mounting height |
Motion detection | Position the camera so movement crosses the field of view |
Outdoor installation | Use a model designed for outdoor use |
Pan/tilt models | Leave enough space for the camera to move |
For model-specific mounting instructions, use the Quick Installation Guide supplied with your camera. TP-Link provides model-specific installation videos and manuals for many Tapo cameras.
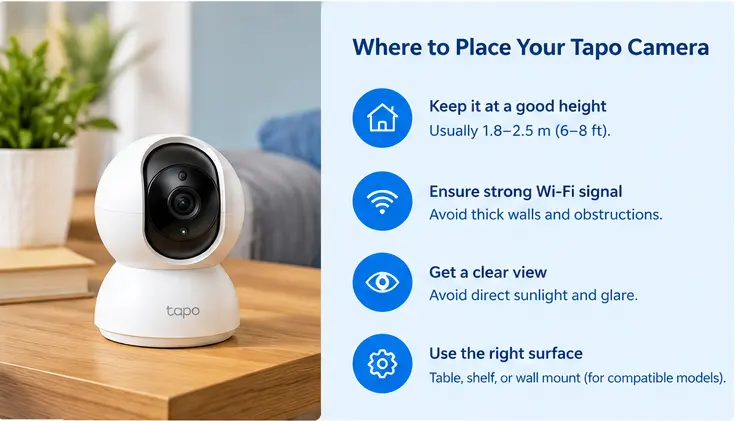
Choose a location with strong Wi-Fi coverage and a clear view before mounting your Tapo camera.
Tapo Camera Setup on iPhone vs. Android
The overall process is almost the same on both platforms, but the permissions and temporary Wi-Fi behavior can differ.
Setup step | iPhone | Android |
Tapo app | Download from App Store | Download from Google Play |
TP-Link ID | Required | Required |
Local Network | May need to be enabled | Not the same iOS permission |
Camera Wi-Fi | May show Tapo_Cam_XXXX | App may guide you differently |
Location permission | Depends on setup/model | May be requested during setup |
Bluetooth | Required for supported Bluetooth setup | Required for supported Bluetooth setup |
No Internet warning | Can appear on camera’s temporary Wi-Fi | May show a security/network warning |
Wi-Fi band | Use supported 2.4 GHz network | Use supported 2.4 GHz network |
On iOS, TP-Link says its apps may require Local Network permission to communicate with local devices. If that permission is disabled, device discovery can fail.
On Android, the app may request location access during certain setup flows. TP-Link’s current camera setup instructions specifically mention granting location access when prompted.
If your phone is connected to the camera’s temporary Wi-Fi and says No Internet Connection, don’t immediately switch back to your home Wi-Fi. Follow the app’s instructions and return to Tapo to continue.
What Do Tapo Camera LED Lights Mean?
The LED is one of the quickest ways to determine what your camera is doing during setup. Exact LED behavior varies by model, but a common Tapo camera pattern is:
LED status | Common meaning |
Solid red | Camera is starting up |
Blinking red and green | Camera is ready for setup |
Slowly blinking red | Camera is trying to connect to Wi-Fi or has not connected |
Solid amber | Connected to Wi-Fi/network on supported models |
Solid green | Connected to the cloud |
Rapidly blinking red | Camera is resetting |
Rapidly blinking green | Camera is updating |
These indications come from TP-Link Tapo camera documentation, but the exact colors and meanings can differ between models. Always compare the LED with your specific camera’s user guide.
The most important LED patterns during setup
Blinking red and green:
- The camera is generally ready to be configured.
Slowly blinking red:
- The camera has not successfully connected to Wi-Fi. TP-Link’s current troubleshooting guide recommends resetting and reconfiguring the camera if it remains in this state.
Solid green:
- On supported models, this indicates that the camera has connected to the cloud.
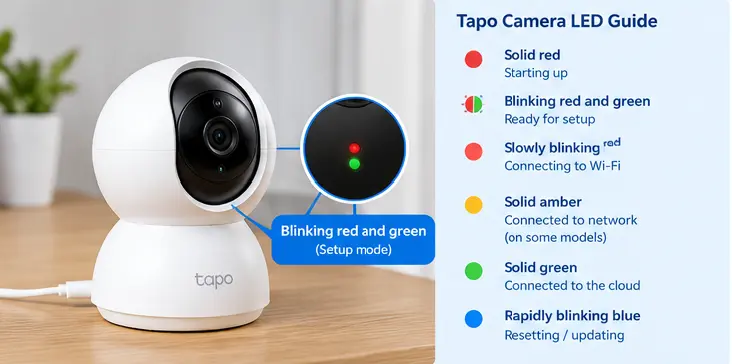
Tapo camera LED colors can help identify whether the camera is starting, pairing, connecting to Wi-Fi or online.
Tapo Camera Setup Not Working? Try These Fixes
If your Tapo camera setup fails, don’t immediately reset everything. First identify where the process stopped.
Problem | Likely cause | What to try |
Camera not found | Wrong model or setup mode | Confirm model and reset camera if necessary |
Camera Wi-Fi not visible | Weak signal or wrong band | Move closer and check 2.4 GHz |
App can’t communicate | Permission/VPN issue | Enable Local Network/Bluetooth/location as required |
Wi-Fi password rejected | Incorrect credentials | Re-enter the password carefully |
Camera connects but disappears | Router/DHCP/cloud issue | Check router and camera status |
Camera works on hotspot | Router configuration | Check router Wi-Fi/DHCP settings |
LED stays slowly red | Tapo camera not connecting to Wi-Fi | Reset and reconfigure |
Setup stops during pairing | Phone/device interference | Restart app, phone and camera |
Camera Is Not Showing in the Tapo App
First check whether you’re looking at the correct Home or Room in the Tapo app. TP-Link says a camera can sometimes appear to be missing because it is listed under another Home or Room.
If it still isn’t visible:
- Check the camera LED.
- Make sure the camera is powered on.
- Keep the phone close to the camera.
- Confirm the correct model was selected.
- Check Local Network permission on iPhone.
- Check location/Bluetooth permissions if requested.
- Disable VPN temporarily.
- Restart the app.
Tapo Camera Won’t Connect to Wi-Fi
If the camera is detected but won’t join your network, start with the Wi-Fi basics. Make sure you’re using the supported 2.4 GHz network for the standard wireless setup.
Then:
- Verify the password.
- Move the camera closer to the router.
- Restart the router.
- Rescan available networks.
- Try setup again.
TP-Link’s current troubleshooting documentation specifically recommends checking 2.4 GHz compatibility and moving the camera closer when the Wi-Fi network cannot be found.
Tapo Camera Connects but Goes Offline
If the camera initially works and later goes offline, the problem may be related to Wi-Fi signal, DHCP, DNS, router settings or cloud connectivity.
TP-Link recommends checking the camera’s LED, router DHCP configuration, network stability and other network conditions. A mobile hotspot test can also help determine whether the problem is caused by the camera or your home router.
A useful troubleshooting test
If possible, temporarily connect the camera to another compatible network or hotspot. If it works there but not on your normal router, the camera may be fine and the issue may be related to your router’s Wi-Fi configuration.
Check the Tapo app, camera LED, Wi-Fi network and router when setup does not complete.
How to Reset a Tapo Camera Before Setup
A reset is useful when the camera has previously been configured, you changed your Wi-Fi network or the camera won’t enter setup mode. However, don’t use the same reset instructions for every Tapo model.
Some Tapo camera user guides distinguish between:
- Resetting Wi-Fi settings
- Performing a full factory reset
For example, one Tapo camera guide specifies holding the reset button for 5 seconds to reset Wi-Fi settings and 10 seconds for a factory reset. Other models can use different procedures.
General reset process
- Keep the camera powered on.
- Locate the RESET button.
- Follow the timing in your camera’s User Guide.
- Wait for the LED to indicate the reset.
- Open the Tapo app.
- Tap + > Add Device.
- Select your camera model.
- Complete the Wi-Fi setup again.
If you aren’t sure which reset procedure applies, search TP-Link’s Download Center for your exact camera model and hardware version. TP-Link publishes model-specific Quick Installation Guides and User Guides.
What to Do After Tapo Camera Setup
Once your camera is online, don’t stop at the basic setup. There are a few useful settings worth checking.
Update the Camera Firmware
Check whether the Tapo app offers a firmware update.
Keeping the camera updated can help maintain compatibility and access current features.
Configure Motion Detection
Open the camera settings and review motion detection. Depending on the model, you may be able to adjust:
- Detection sensitivity
- Detection zones
- Activity areas
- Detection schedules
- Person detection
- Pet detection
- Vehicle detection
Available options depend on the camera model.
Add a microSD Card
If your camera supports local storage, you can install a compatible microSD card and initialize it through the Tapo app.
TP-Link’s current setup documentation lists microSD storage as an option on supported cameras.
Share the Camera With Family
If other members of your household need access, use the Tapo app’s sharing feature instead of giving them your TP-Link ID password.
TP-Link setup documentation confirms that the Tapo app can grant other TP-Link accounts access to a camera.
You can use our share your Tapo camera with family guide for the detailed process.
Check the Live View
Finally, open the live video feed and confirm that:
- The image is clear.
- Night vision works when needed.
- The camera is pointed correctly.
- Motion detection is working.
- Notifications arrive as expected.
- The camera remains online.
Frequently Asked Questions
How do I set up my Tapo camera?
Download the Tapo app, sign in with your TP-Link ID, power on the camera and put it into setup mode. Then tap Add Device, select your camera model, connect the camera to your phone when prompted, select the supported 2.4 GHz Wi-Fi network and enter the password.
Which app do I use to set up a Tapo camera?
Use the official Tapo app from TP-Link. It is available for iPhone and Android devices and is used to add compatible Tapo cameras, connect them to Wi-Fi, manage settings and view the live feed. A TP-Link ID is required for setup.
Why is my Tapo camera not showing in the app?
Check that the camera is powered on, in setup mode and that you selected the correct model. Also check phone permissions, including Local Network access on iPhone where required. If the camera was previously configured, it may also appear under another Home or Room in the Tapo app.
Why won’t my Tapo camera connect to Wi-Fi?
Check that you’re using the supported 2.4 GHz Wi-Fi network, verify the password and move the camera closer to the router. If the network still doesn’t appear, restart the router, rescan the Wi-Fi list and try the setup again.
What does a blinking red and green light mean on a Tapo camera?
On many Tapo cameras, a blinking red and green LED means the camera is ready for setup. If you don’t see this pattern, check your model’s guide because LED behavior can vary between cameras.
Can I set up a Tapo camera without Wi-Fi?
A network connection is required during the initial configuration of a Wi-Fi Tapo camera. Once configured, some cameras can continue recording locally to a microSD card during a temporary network outage, but live view, playback through the app and push notifications may not be available without the network connection.
Final Thoughts
A Tapo camera setup is usually straightforward when you have the correct model, the Tapo app, your TP-Link ID and a compatible Wi-Fi network ready.
Start by installing the app and signing in, then put the camera into setup mode and follow the on-screen instructions. For the standard wireless setup, make sure your camera can use the required 2.4 GHz Wi-Fi network and keep your phone close to the camera while pairing.
If setup fails, don’t immediately assume the camera is defective. Check the LED, Wi-Fi band, password, phone permissions, router connection and camera placement first. A reset can help when the camera is stuck in an old configuration, but always use the reset procedure for your exact model.
Once everything is working, take a few minutes to configure motion detection, local storage, firmware updates and family sharing. You can then use related guides such as Tapo Camera Login to manage the camera beyond the initial installation.